Hello everybody, this is the moment one, or maybe two of you have waited for *drum roll* ... A brand new tutorial! In this supplication, I will hopefully succeed on learning someone how to use gradient tool and make a pixel effect in Adobe Illustrator cs5, and perhaps it will work in cs4 too...
Gradient Tool! First of all, it's a tool, and second of all, it's a useful tool. With this tool you can avoid the boring and hard colors in your drawings. Gradient tool can be used to make sunset, where the color of the sky vary. Here's an example:
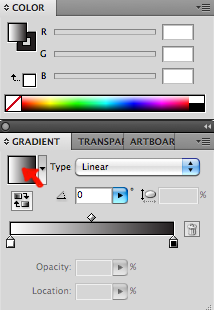
There is two ways to use Gradient Tool, and it might be easier to start with the first one. You will need to open the windows called Color and Gradient. Create a rectangle, or any other figure. Make sure you have marked it using the black arrow. Click on the square in the gradient window and your rectangle gets colored.
To change the color, click on the rectangle in the gradient window and some tags shows up. Click on one of them, and go to the color window to change it. You can choose between grayscale, rgb, cmyk etc. if you click on the tiny arrow on the top right of the window.
 |
| To the lower left you can see some tags, click on the white one to change its color. |
I chose RGB and the color light blue instead of white. If we take a look at this color bar, almost everyone of you will be able to see the tiny black and white square on top of it.
Click and drag to adjust how much of each color you want. If you click below the bar, a new tag is created. You can make as many tags as you want, but there is a limit of space , so you can't make more than 30 or so. You can now choose where the fade shall start. You can color each tag with different colors, or an other nuance of the same color.
Now, for the next step open the Swatches window. The first time you open it, there will be many colors there already. To make your own color palette, go to the tiny arrow on the top right and choose Select all unused, then Delete Swatches.
 |
| Make your own color palette. |
 |
Drag the color over to the
Swatches window
to add it. |
If you are happy with the gradient, click on the color and drag it over to the swatches window. The color will be stored there. The colors you've saved will only stay in the current project.
This was the first way to use gradient tool, and here comes the other. If you have a gradient color saved in swatches, use that one, or keep using the same you made during this tutorial. Make the color in the rectangle white.
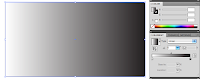
Then select Gradient Tool in the Tool box.

Click somewhere outside the rectangle and drag a line almost through the rectangle.
 |
| Example |
 |
Hold over the line and you can actually edit the color
from the line, and it will also show in the
gradient window. It's easier to see how the colors
change if you adjust them on the line. |
Have fun with this Tool.
...........................................................................t...t...t...t...t...t...t...t...t...t...t...t...This tutorial is not finished yet. So do not leave! THIS was only the first part!
I have always wanted to draw a tree, with all the leaves on, but this seems like lot of work. Well, for the last project, I made some trees. They made the whole picture look like a catastrophe. The objects lost their coherence. There was no story for the picture to tell! But then, when my hope almost had disappeared, I managed to raise my hand, and just in time, a teacher came by and asked "what is it?". I nearly whispered the words "How...can...I...make...the...trees...look...like...trees...?". And then she said, and my hope went up a little :"I don't know, but maybe another teacher does?"... The other teacher came right before my hope left my soul, and i whispered the same sentence. She said: Well, we can try to use color halftone, it will make the color into pixel patterns. ... ... ... YES! I suddenly got my hope back! And now, I am going to share this feeling with you during this second part of this extremely long TUTORIAL! (By the way, I am not so sure, but I might be the only person with this much passion for trees.)
FIRST of ALL,
make a tree. THEN, make many more trees, make a whole forest! Make it curl around a healthy and fresh-water river. Draw in a sunset using the gradient tool, and then color your forest with a nice and light green color. When all this (or just the forest) is done, we can start to absorb some useful experience.
Group the trees, that creates a forest. Or first you will have to make a tree......... Make many circles and set them together. Open Pathfinder window.
THEN! Push this button when all the circles are marked:

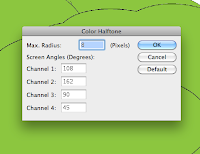
They will now connect to one form, which is good, since it's gonna be 1 tree, not 5 circles. Lets do something. Go to Effect, and then go to Pixelate and then go to Color Halftone!
A window will pop up, and you can choose max radius, I suggest 4 (minimum).
Now, this is the part where your patience comes in handy, because the more trees you made, the longer you will have to wait for the color halftone to finish. Hehe. It's so annoying, that I took a screenshot of it. You will see it later. If you ZOOOMe in, you see circles. Circles are definitely not pixels. So this effect should be renamed. But, it's perfect for §TREES!!!
 |
| Is it just me or isn't this screen shot horizontal? |
 |
| Totally wrong |
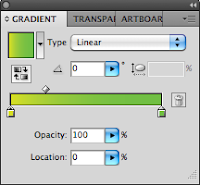
Place your forest near the beautiful river. If you have used gradient tool on the rest of the picture, except the trees, you will have to make the trees gradient too. Mark the entire forest, and make a gradient which has the same color as the trees on the first end, and a lighter color on the other end of the bar.
NB! When you make this gradient, don't have the trees marked yet, cause you will waaaaaaste very much time.
After making the gradient color, mark your forest and click on the color you just made. Adobe Illustrator CS5 will now use all it's powers to make the trees gradient, so prepare to wait. Meanwhile take a look at this screenshot of Illustrator working with it!
 |
| This is how the trees look like when you click on the color, and we don't want them to look like this, do we? But, to control which way the gradient effect shall go, the object needs to have a gradient color on beforehand. Or else it wont work. |
After the color halftone is done, activate the Gradient Tool from the tool box. Then, make sure to have some of the trees marked (I marked the left part first, since the sunlight changes the light on both sides). Then simply drag a line. Then the color halftone progress appears again... After it is finished, the gradient color will change.
 |
| Totally right |
Wow, the left side suddenly got so much better to look at. When you have this pixelate effect added, remember that every single change will cause the program to do the color halftone progress over and over again, even if you move it a little bit to the left. Well, meanwhile this progress is going on, you can try to read the words. There is two different sentences, the first is Color Halftone, and can you find out what the next is :O?
(If you don't want to, it says: Rasterizing Artboard).
I am very sorry for making an extremely long tutorial, and this will never be repeated. The gradient tool part was ok, but I think I shouldn't made an entire background story to tell you why the pixelate effect looked nice on trees... Overdramatic...
This tutorial might be complicated to read and understand, so if you want, I can make a tutorial on how to understand my tutorial.
And now for something completely different! If you like the German language, and the New Norwegian language (Nynorsk) I recommend to turn on the TV at 5'o clock at NrK2. It's so worth it!
Hav
e a ni
ce da
y!
This supplication was posted 17.45